> For the complete documentation index, see [llms.txt](https://spaceandtech-engineerings.gitbook.io/space-and-tech-engineerings-docs/llms.txt). Markdown versions of documentation pages are available by appending `.md` to page URLs; this page is available as [Markdown](https://spaceandtech-engineerings.gitbook.io/space-and-tech-engineerings-docs/flight-controller/aazmuth/basic-configuration-and-calibration/escs-and-motor-connection.md).
# ESCs and Motor Connection
This article explains how to connect the ESCs, motors and propellers to Aazmuth.
Connect the power (+), ground (-), and signal (s) wires for each ESC to theAazmuth's main output pins labeled M1 to M8 as by motor number Refer to the image below for better understanding. Find your frame type below to determine the assigned order of the motors.
## ESC Calibration Setup
Go to ESC Calibration Tab Under SETUP and then remove the propellers from the motor then follow the instruction given on the screen.
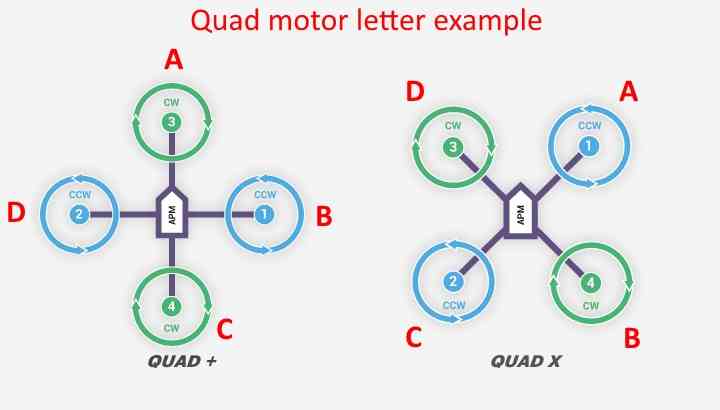
### Motor order diagrams.
The diagrams below illustrate the motor sequence for each frame type. Propeller rotation is marked in green for clockwise (CW) and blue for counter-clockwise (CCW). The red labels identify the motors to activate during Mission Planner's Motor Test, located under SETUP > Optional Hardware.
#### QUAD FRAMES.
     
{% hint style="info" %}
**Note**
Quad A Tail and V Tail frames do not rely on the front motors for yaw control (NYT). Motor rotation direction is not essential for basic operation. However, without opposite rotation on the front motors, roll and pitch inputs may produce adverse yaw, reducing the effective range of yaw control.
{% endhint %}
     
{% hint style="info" %}
**Note**
Quad "No Yaw Torque" (NYT) frames are primarily designed for VTOL tailsitter configurations equipped with large control surfaces. The direction of motor rotation is not critical for these setups. However, unless the motors are configured to spin in the standard opposing directions of a typical quad frame, roll and pitch inputs may cause adverse yaw, which reduces the effective dynamic range of yaw control provided by the fixed-wing control surfaces.
{% endhint %}
 
#### HEXA FRAMES
    
#### TRICOPTER FRAMES
 
{% hint style="info" %}
**Note**
In tricopter configurations, the tail (or nose) servo handles yaw control, so motor rotation direction is not essential for basic operation. However, unless the front motors rotate in opposite directions, roll and pitch inputs may produce adverse yaw, reducing the effective range of yaw control.
If the tail (or nose) servo moves in the wrong direction in response to yaw inputs, set either the RCn\_REVERSED parameter for the corresponding RC input or the SERVOn\_REVERSED parameter for the tilt servo to 1 (reversing it from 0). For detailed instructions, refer to the TriCopter setup page.
{% endhint %}
#### Recognizing clockwise and counterclockwise propellers
The diagrams above show two types of propellers: clockwise (called pushers) and counterclockwise (called pullers). The most reliable to recognize the correct propeller type by its shape as shown below. The thicker edge is the leading edge which moves in the direction of rotation. The trailing edge is more radical scalloped and usually thinner. 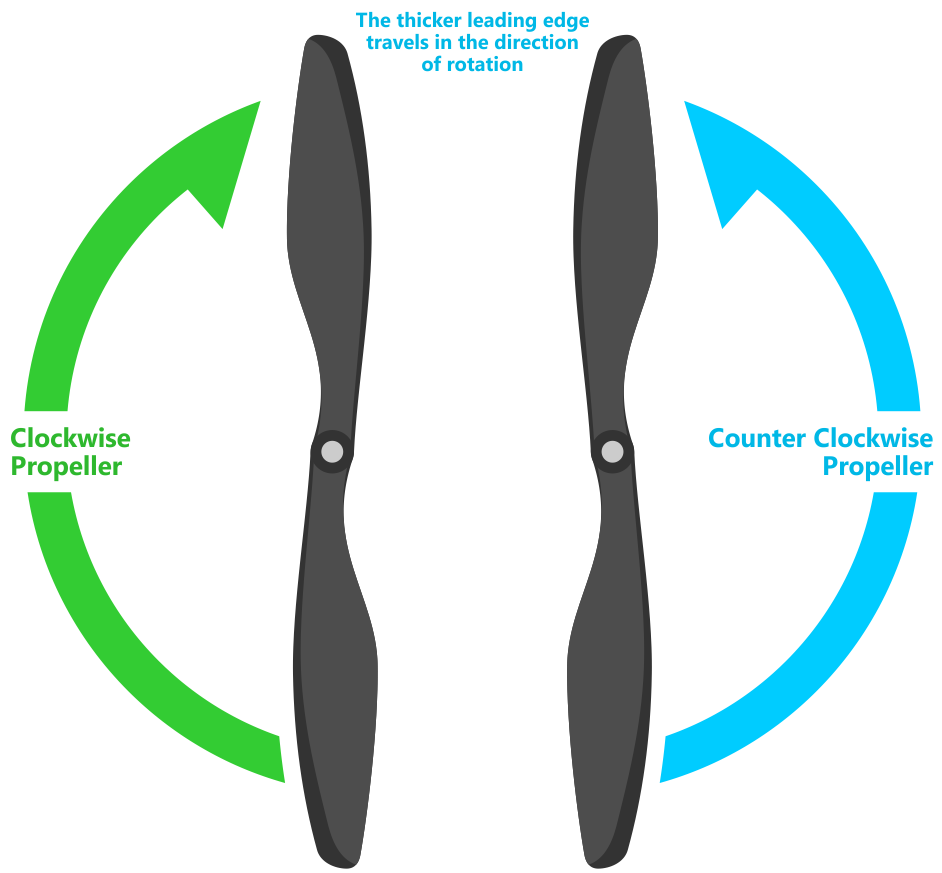
### Testing motor spin directions
If you have completed the Radio and ESC calibration, you can check that your motors are spinning in the correction direction:
1. Make sure there are no propellers on your copter!
2. Turn transmitter on and ensure the flight mode switch is set to Stabilize.
3. Connect battery.
4. Arm copter by holding the throttle down and rudder right for five seconds.
5. If it fails to Arm with the throttle down and to the right and the motors will not spin, it has probably failed the Pre-Arm Safety Check.
* Pre-Arm safety check failure is also indicated by the red arming light double flashing and then repeating.
* If the Pre-Arm check fails go to the Prearm Safety Check Page and correct the problem or disable the check before continuing.
6. When you can Arm successfully, apply a small amount of throttle, and observe and note spin direction of each motor. They should match directions shown in the images above for the frame you’ve chosen.
7. Reverse any motor spinning in the wrong direction.
Tip
Motor Direction is reversed simply by interchanging two of the
three ESC to motor power leads.
### Checking the motor numbering with the Mission Planner Motor test
An alternative way to check that the motors have been hooked up correctly is to use the “Motors” test in the Mission Planner Initial Setup menu.
When connected to the vehicle via MAVLink, you can click on the green buttons shown above and the corresponding motor should spin for five seconds. Letters correspond to motor numbers as shown in the example below.
* Take off your props first!
* If no motors turn, raise the “Throttle %” to 10% and try again. If that doesn’t work, try 15%
The first motor to spin will be the one located directly forward in the case of + configuration, or the first motor to the right of straight forward in the case of X configuration. The motor test will then proceed in a clockwise rotation.
---
# Agent Instructions
This documentation is published with GitBook. GitBook is the documentation platform designed so that both humans and AI agents can read, navigate, and reason over technical content effectively. Learn more at gitbook.com.
## Querying This Documentation
If you need additional information that is not directly available in this page, you can query the documentation dynamically by asking a question.
Perform an HTTP GET request on the current page URL with the `ask` query parameter:
```
GET https://spaceandtech-engineerings.gitbook.io/space-and-tech-engineerings-docs/flight-controller/aazmuth/basic-configuration-and-calibration/escs-and-motor-connection.md?ask=
```
The question should be specific, self-contained, and written in natural language.
The response will contain a direct answer to the question and relevant excerpts and sources from the documentation.
Use this mechanism when the answer is not explicitly present in the current page, you need clarification or additional context, or you want to retrieve related documentation sections.